There is no dearth of water on earth, but in some places its shortage is increasing day by day. MEET Industry has created a product. Which people have been using since 2007. By applying this, the motor will automatically stop after filling the water tank kept on the roof. Due to which even a drop of water will not come out of the tank. This will also save drinking water, and with less motor running, power consumption will also be reduced. Due to less running of the motor and no water reaching the roof every day, the life of the motor will also increase, as will the paint and P.O.P. of the house or building. And the foundation of the house will also remain strong.
Semi-Auto: The motor will not start automatically, and it will stop automatically after the tank is filled to a certain level.
Fully-Auto: The motor will start automatically, and the motor will automatically stop once the tank is filled to a certain level.
Automation system

An automation system is an integration of sensors, controls, and actuators designed to perform a function with minimal or no human intervention.
1. Automation Lights Sensor
2. Automatic Sliding Gate Motor
Theft Protection
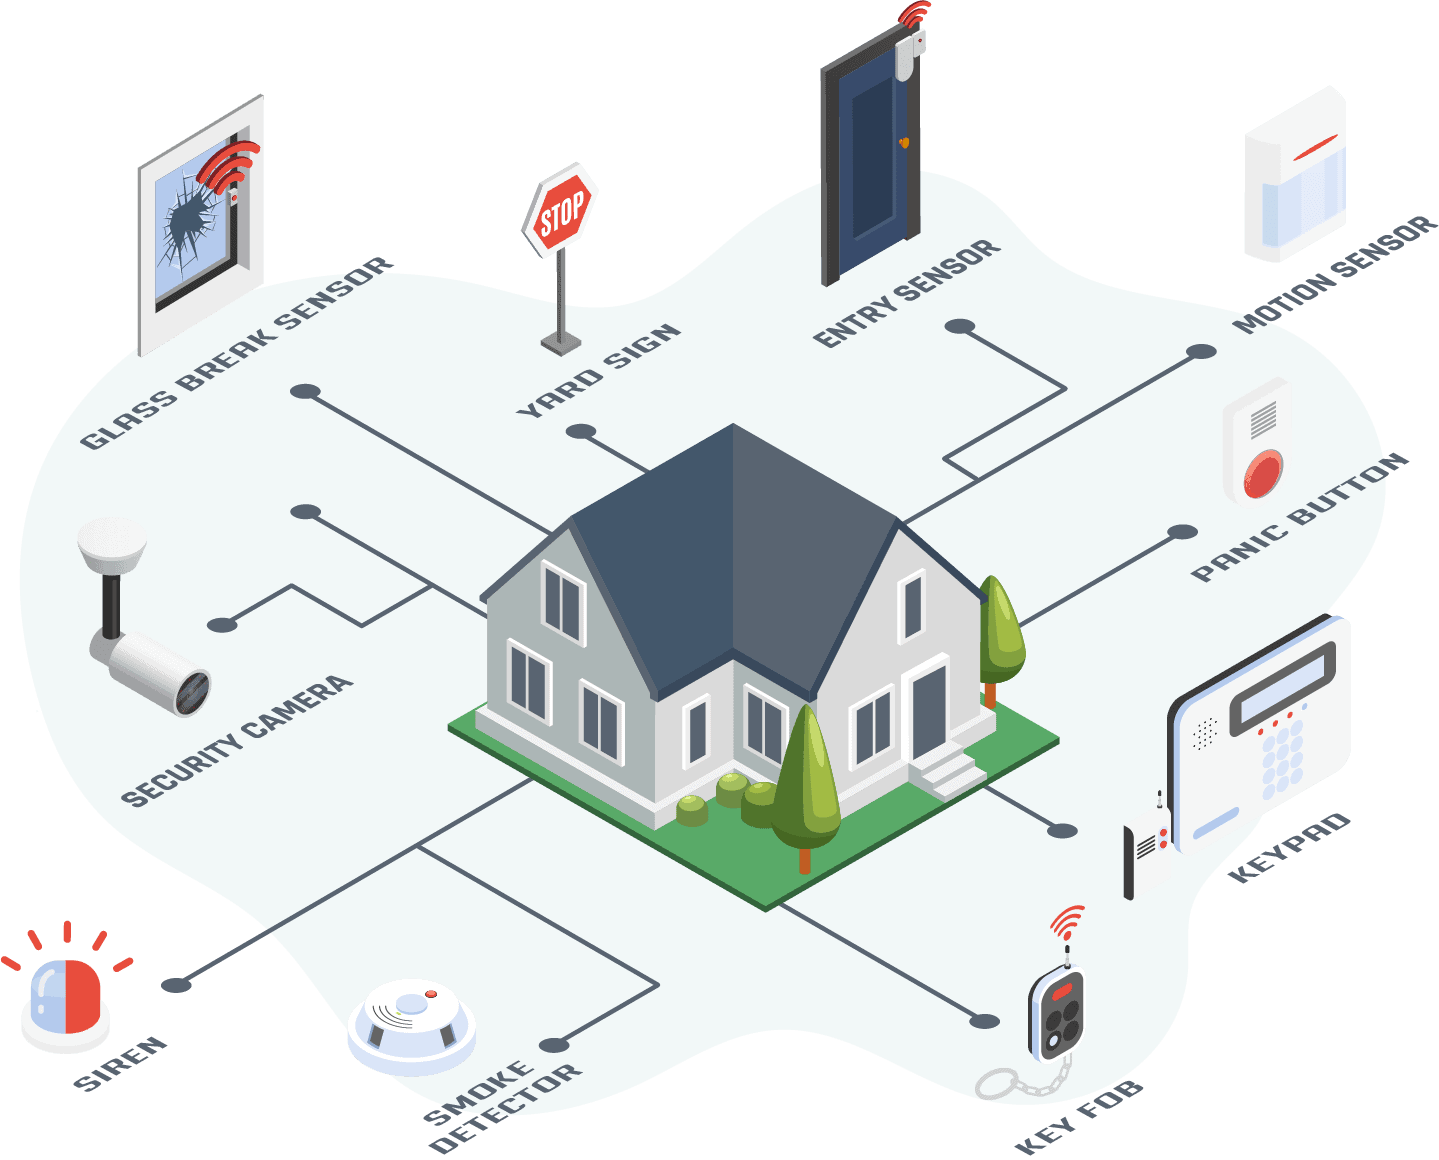
Incidents of theft keep happening in every area. I don't know who will come with what intention. We should install sensor security in our house to protect our lives and those of our family. This can be done as follows:
- Audio Video Door Phone: Through the audio video door phone, we can stop the person coming to our house, listen to him from our gate, and see him. Allow entry inside the house only after checking the intention of the visitor.
- Theft alarm: Through theft alarm, we can sleep peacefully by installing sensors on the windows, doors, or other vulnerable places of our house from where the thief can enter. In case of any unwanted tampering, the siren will sound in the house through the theft alarm, and the bell will ring on all the phone numbers that are saved.

Fire safety
.webp)
A Fire can happen in any house for any reason. Fire safety can be done according to your needs through these systems.
- Portable fire extinguisher.
- Fire hoses.
- Fire hose rack and monitor.
- Emergency light & Siren.
- Checking and Controlling.
- Hood and duct in the building.
- Self-contained breathing apparatus (SCBA.)
- Air purifying respirator.
Self monitoring
Self-monitoring: No matter what work we do, unless we have self-monitoring, that work cannot be done according to us.
Challenges
- No proper recognition of the customer and staff
- Monitor staff behavior against customers
- Preventing shoplifting has been one of the primary concerns
- Most prone to break-ins after retail hours
- Optimizing the shop floor efficiency.
- Purchase Invoice tracking
- Right deployment of staff, when the store is busiest
- Effective promotional offers.
- Keeping a watch on your housekeeping staff to ensure that they keep the store neat and clean
Solution
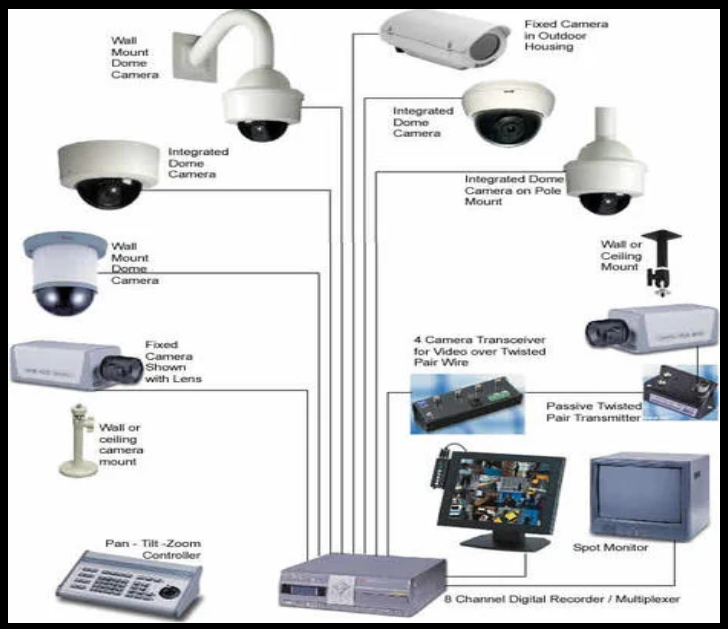
- High resolution cameras for 24x7 monitoring
- People counting cameras at entrance points for footfall count and to know the trend of business
- Fisheye cameras for floor areas to cover 360° view with one camera
- Heatmap analytics to monitor the crowd at different store for business analysis
- Announcement for the promotions via audio I/O in camera
- High FPS camera at cash counter to monitor all transactions closely
- POS integration with cash counter cameras to make video more meaningful
- Panic Button at Cash counter for emergency situation
- Low light cameras in store rooms

Installation of solar systems
Solar Panel Installation
Solar System Components
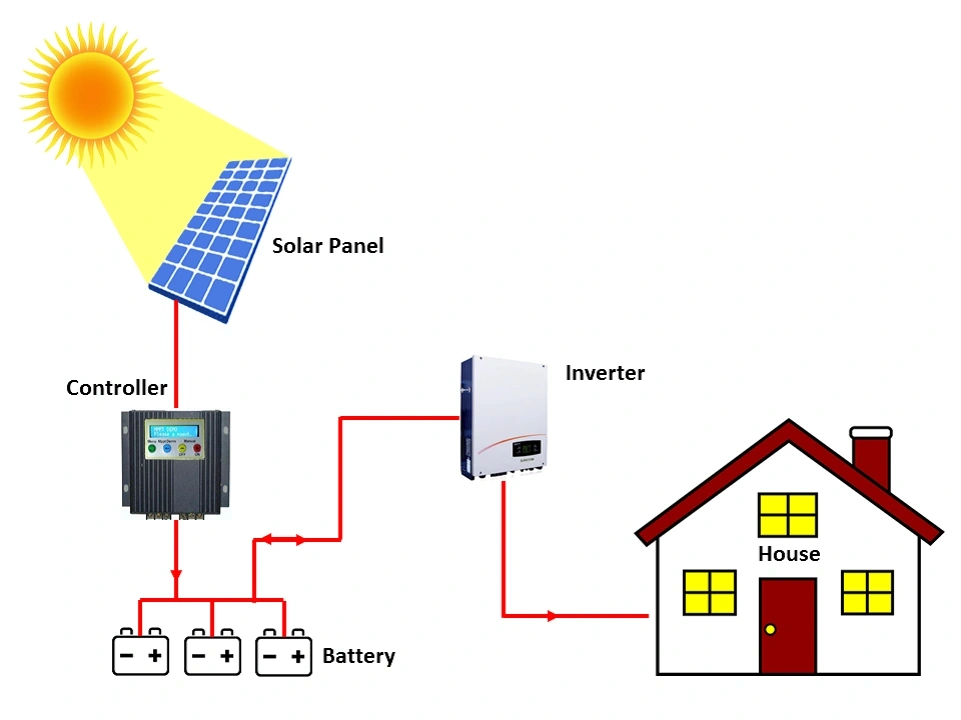
Solar systems are made up of solar panels (modules), a mounting system, and a solar inverter with computerised controller. Solar panels produce DC electricity from sunlight. Then the inverter converts the generated electricity into AC, so that it can be used in the household. The computerised controller manages the solar system and ensures optimal performance. If you want battery backup system or an off-the-grid solar system, a battery is required.
Solar Panel Installation Process
The most common location for the installation of solar PV panels is the roof. Most roofs typically have the desired specifications for the installation, so that panels get the maximum sunlight.
Nevertheless, if installation on the roof is not applicable or desired, the solar panels could also be mounted on the ground. You just need to make sure that there are no objects blocking access to the sun.

The following steps explain solar panel installation on a roof:
1. Set Up Scaffolding
Firstly, you have to erect scaffolding to ensure safety during the whole installation process when being on the roof.
2. Install Solar Panel Mounts
Then, the solar panel mounting system has to be set up. This will support the base of the solar panels. The whole mounting structure must be tilted and have an angle between 18 to 36 degrees to have maximum sunlight exposure.
3. Install the Solar Panels
When the mounts are set up, the solar panel itself has to be installed on the mounting structure. Make sure to tighten up all the bolts and nuts so that it stays stable.
4. Wire the Solar Panels
The next step in the installation process is to install the electrical wiring. In most cases, MC4 connectors are used because they are suited for all types of solar panels. Make sure to shut off the household’s electricity supply during the wiring installation.
5. Install Solar Inverter
After that, the solar inverter must be connected to the system. It is typically installed near the main panel and it could be both indoors and outdoors. Inverters are more efficient if kept in a cooler place.
If the inverter is outdoors, it should be kept out from the afternoon sun. If it is installed indoors, the garage or utility room are usually the best places, since they stay cool for most of the year and have ventilation.
6. Bond Solar Inverter and Solar Battery
Thereafter, the solar inverter has to be connected to the solar battery. The solar battery storage can save you from worrying about the lack of usable energy during cloudy times, it can also lower the solar battery storage system costs during installation.
7. Connect the Inverter to the Consumer Unit
The inverter should be connected to the consumer unit to generate electricity. A generation meter should also be connected to monitor the amount of electricity the solar panels actually produce. You can use your computer or other device to check your solar system’s performance. For example, you can check how much electricity you generate at different times and decide what time is suitable for using your washing machine or other utilities.
8. Start and Test Solar Panels
The final step is to switch the power on and test the newly installed solar panel system. After that, the solar panel installation process is completed.

MEET Industry has made some videos on advanced technology and customer demand for the satisfaction of its users. Click to watch and buy them.

